Wednesday, September 08, 2010

Post-Con costume showing off

Not a whole lot to this post, just showing off the finished products.

Supergirl:

0905101540a

0905101617a

0905101543
With George Perez!

Miss Scarlett:
DragonCon is Clue

And I didn't manage to get a picture of my Ramona Flowers costume, but here's a picture of a set of random Ramonas, because Ramona was this year's Jack Sparrow/Storm Trooper/Jayne/Captain Hammer, so I think you get the gist:
DragonCon 2010 Friday: Ramona, Ramona, Ramona! (Scott Pilgrim vs. the World)

Hooray! Now to start planning for next year!

Thursday, August 26, 2010

Well that's just Super.

When I started doing con costuming, there was one thing I knew for sure: There was no way in hell I would ever end up doing a Supergirl costume.

At first glance, Supergirl was everything I disliked about Superman. Truth, justice, and the American Way, Mom, apple pie, and boy scouts, and any other opinions bedamned. Then she morphed into a teenage trollop with the unfortunate habit of fighting the Good Guys whenever they suggested she take a little responsibility along with those massive powers, or, alternatively, randomly turning evil with a little provocation.

But in the end, just as All-Star Superman had done for Supes, Wednesday Comics showed me that there could potentially be more to poor, maligned Kara Zor-El than short skirts and a bad party girl attitude. And that something more, specifically? Weapons grade quantities of cute. It certainly wasn't hurt by being written by the current Powergirl team, but as a take on the character I had never seen before, it really changed my mind about her.

This is all a long story to explain why this happened tonight:


This is closer to the DC Animated Universe version, but considering my limited funds this year, it was the easiest way to do it.

Naturally, a Super Pet will be making an appearance:


So that concludes our lesson in "never say never", because there's always some unbearable cute out there to trip you up!

Tuesday, June 29, 2010

It's been a minute since I updated, so I guess it's a good thing that I'm working on a new pattern.


It's a hanging fruit basket for the kitchen, and it's almost done. It's a pretty simple pattern, just short rows and yarn overs in kitchen cotton, but I think it looks pretty fabu.

I'm in the process of getting it attached to the hoops at the moment, and then I've got to get the actual chain to hang it from the ceiling with, but it was altogether a super quick project.

I'll post some better pictures once it's finished, which I promise will not be 3 months this time.

Tuesday, March 23, 2010

A Conundrum...

At some point, when you're trying to sell your crafty things, you come to a point where you're torn between selling something as you'd originally intended, or keeping it when it turns out much better than you'd thought. Like so:


I'd seen these pieces hanging next to each other in an endcap and thought how nifty they'd look in a necklace. The original intent was just to put it on Etsy, but now I kinda want to keep it all for my greedy little self. It's a lot more striking than I'd thought it would be, and I personally don't have a lot of impact jewelry.

Ultimately, tho, I'd probably never wear it, so as much as it pains me, it'll probably go up for sale. Hopefully, someone will have a better home for it.

Wednesday, December 30, 2009

Hey kids! Santa brought me a nifty netbook, so now I'll be able to update every once it a while! Hooray!

To celebrate, I bring you a pattern I made this time last year for Knitty. They didn't want it, but maybe you will!

Thusly, I present the Chubby Checker scarf (link goes to Etsy) (Please see update below.).


Yes, you have to pay for it (sorry), but it's probably the best pattern I've done yet, and it's pretty kickass-awesome.

That said, toodles until next time (which should be much sooner!)

Update: The Chubby Checker pattern is now free. You can find it here.

Saturday, August 25, 2007

Huzzah!

Fin!


All that's left is to sew on the patch. Well, and to get the tie and the socks and the skirt before Friday. But let's not push it.

In any case, I'm pleased with how it came out, even with having to take in the sides. Not particularly in any rush to make another any time soon, but still...

Anyway, this weekend is a costuming cram session, what with DragonCon starting next Friday. So far, I finished the sweater, and the hard stuff (aka sewing) on zombie Ms. Marvel. There's still a lot left to buy, and a lot left to do, but I think I'll be ok. At least, I hope.

Monday, August 06, 2007

A shortcut to radishes.

I was struck with inspiration this afternoon. You see, I've been struggling with how to make the radish earrings required for any good Luna Lovegood costume. I could've sculpted them out of clay, but that's not exactly one of my strong suits, my search for charms that look like radishes had been fruitless, and any handmade earrings for sale on Ebay were running upwards of $20. I'm already going to have to spend a pretty penny on a skirt and tie, so 20-30 dollars on a pair of earrings I'm going to wear once a year isn't really an option.

Then, while in Joann's, I stumbled upon a set of spherical red buttons, and thought to myself that they could easily pass for a radish. I found some leaf shaped beads (in the process, I also found better red beads for my purposes), and it was as simple as that:


Close-up!


All you really need is two big red beads (1/2"-3/4"), four leaf beads (I used two each of different sizes), two eyepins (you could totally use headpins if you wanted, I had eyepins on hand, and I think it makes the bottom look more like the squiggly radish tail), and french hooks or whatever post you prefer. Put the red bead on the pin, followed by the leaves, make eyes, and attach to the hook.

I'm really pleased with these. Now I just need to get hooks, and then work on the Butterbeer necklace - I picked up corks for that today. They're soaking, and should be ready for stringing up later this week.

Huzzah!

Wednesday, July 18, 2007

Trinity scarf pattern, at long last!

I knit this scarf YEARS ago, sold it in a yard sale, and had all but forgotten it until I stumbled across the book I had originally found the stitch pattern in. So here we go!


Trinity Scarf

Materials:
Red Heart Soft (100% acrylic)
[MC] White, 2 skeins
Red Heart Super Saver (100% acrylic)
[CC] Monet, 1 skein or less

US size 7/4.5mm needles

Crochet hook

Gauge:
1 bobble = approx. 1 inch in Trinity stitch

Trinity stitch pattern:
Row 1 (and all odd rows): P
Row 2: (K,P,K) all in next st, P3 tog. Repeat across.
Row 4: P3 tog, (K,P,K) all in next st. Repeat across.
(Stitch pattern from Beginner's Guide Knit Stitches & Easy Projects by Leisure Arts Little Books.)

Directions:
In MC, CO 36 sts.
Work Trinity stitch pattern for 248 rows. BO.
Using CC and starting at CO corner, run yarn through eyelets along a diagonal (see photo above), turning to run at a 90 degree angle on ends. Repeat for next two eyelets on CO edge.
Add fringe to CO and BO edges.

Congrats, you has a scarf!


Saturday, July 07, 2007

Sox are done!


Hooray! I want to knit, like, ten more pairs!

Monday, July 02, 2007

Publish or perish!

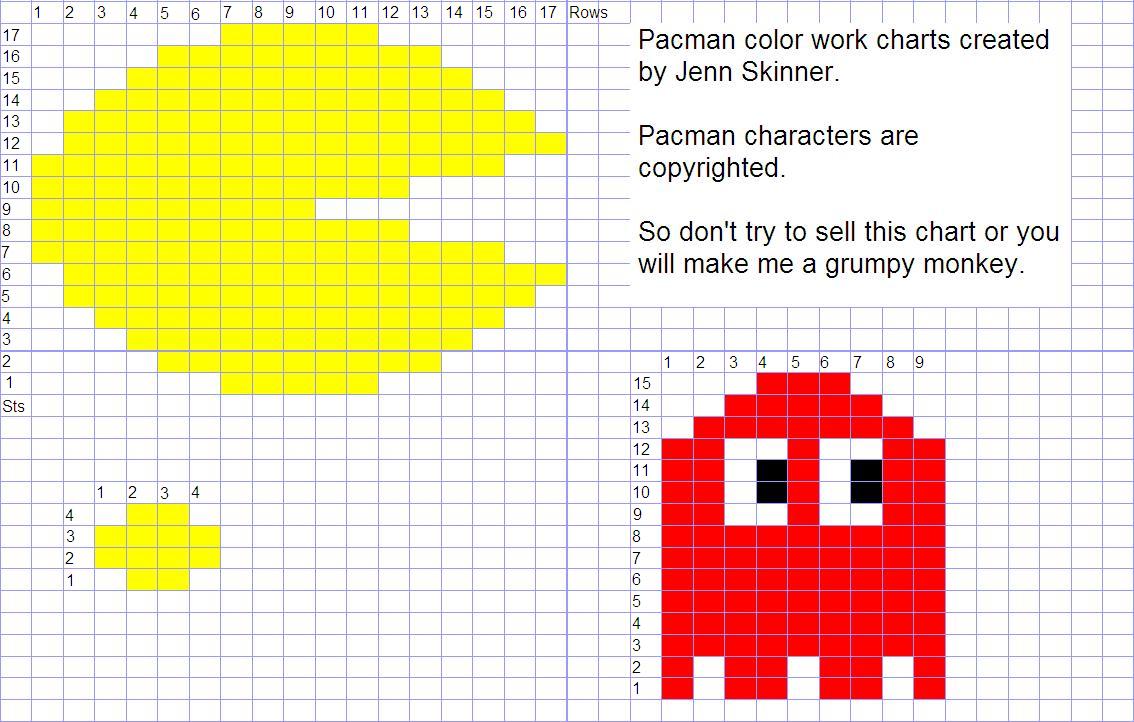
There was a request on Ravelry for a pattern to the Pacman scarf I came up with in 2005. The primary reason I hadn't put it up yet was because I didn't have a decent graphic of the color charts, so I finally got off my duff and made some:


Link to the Past full size.

Ok, here goes. This is my first time writing a pattern, so be gentle.

Pacman scarf

Materials:
Red Heart Soft (100% acrylic)
[MC] Black, 2 skeins
[CC1] Yellow, 1 skein
[CC2] Red, blue, pink, or orange (or whatever color you want your ghostie to be), 1 skein
[CC3] White, 1 skein or less

One 12" circular needle in size to fit gauge

Crochet hook for fringe

Gauge:
18 sts / 26 rows over 4 inches

Pattern Notes:
I knit this in the round using Fair Isle. It can very easily be translated to flat knitting with intarsia. It can also be knitted with the Pacman motif on both sides by placing a marker at 25 stitches and repeating the directions from the marker as if from the beginning of the round.

Directions:
Using MC, cast on 50 sts. Join round, being careful not to twist sts. K ten rounds.

Round 11-27: K 4 sts in MC. Begin Pacman chart using Fair Isle technique and CC1.

Round 28-35: K all sts in MC.

Round 36-39: K 10 sts in MC. Begin pellet chart using CC1.

Repeat rounds 28-39 twenty-nine times, or until scarf is about 4.5 inches shorter than desired length.

K eight rounds in MC.

K five sts in MC. Begin ghost chart using CC2 and switching to CC3 or MC when necessary.

K ten rounds in MC. BO.

Using crochet hook, hook fringe through open ends of scarf to close.

And that's more or less it. Your neck is now 8-bits warmer.

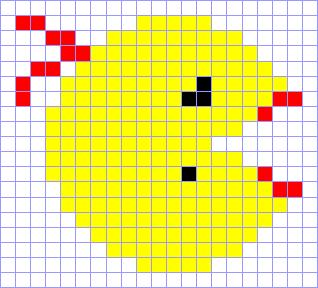
EDIT: Ms. Pacman chart now available! Please note that this chart is 19 rows long instead of 17, and adjust pattern accordingly.

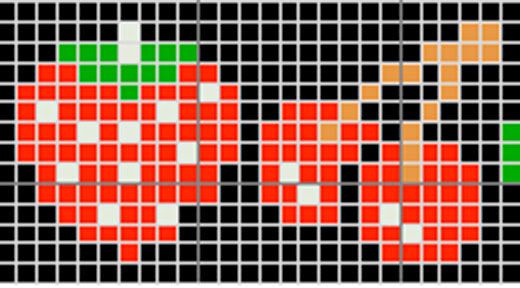
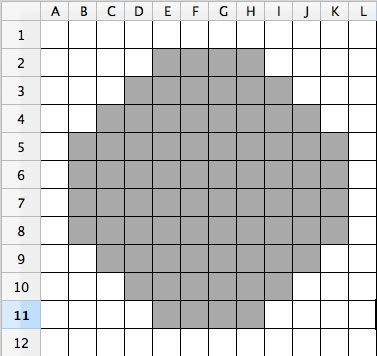
Ravelry user Gelliebean sent me some charts for Pacman's cherry and strawberry (originally from Spritestitch), as well as a Power Pill chart she created. Thanks!